FREE Crochet Pattern – Chameleon Hat – Gone Fishin’
Welcome back to another delightful crochet project! Today, we have an absolutely adorable, wonderfully practical, and beautifully playful pattern for the littlest ones in your life: the Chameleon ‘Gone Fishin’ Hat! If you love crafting sweet nursery accessories that perfectly capture classic handmade charm while offering a fun, brimmed design perfect for keeping the sun off during outdoor family adventures, this brilliant little hat is going to be your next favorite make.
This fantastic baby hat pattern is wonderfully adaptable and perfect for unforgettable handmade baby shower gifts, allowing you to whip up beautiful, lovable baby garments in no time that will keep baby shaded and be cherished as a family keepsake for years! While the instructions highlight a specific beautiful, adventurous look, you can easily adjust the color variations depending on the worsted weight yarn used—swap out outdoorsy tones for magical pastels, bright pinks, or vibrant bold hues to create a whimsical, personalized baby accessory! Grab your hooks, settle into your favorite crafting spot, and let’s dive into making this wonderfully practical, cozy little hat!
Now that the warmer weather is here and school is out, my mind wanders to slower summer days, spent relaxing with family and friends and leisurely pursuing hobbies and so, the June Chameleon Hat was inspired and aptly named – Gone Fishin’.
In keeping with my basic Chameleon Hat, this one has the half double crochet crown, and shelled band, but it is designed for a looser fit and squared off top, with a roping around the band and, of course, a couple of little fish because they are just darned cute!
I think it’s still cute without the fish and makes a pretty nice classic sunhat as well.
There are so many different ways to personalize your hat…….
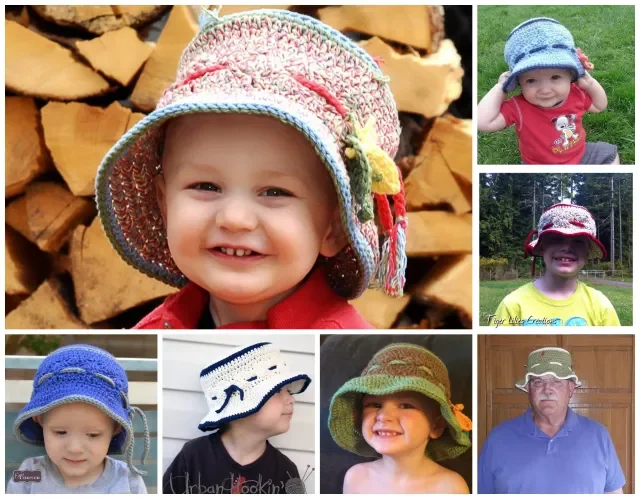
so have fun decorating your hat and take a look back at the previous versions too! ~Maria~
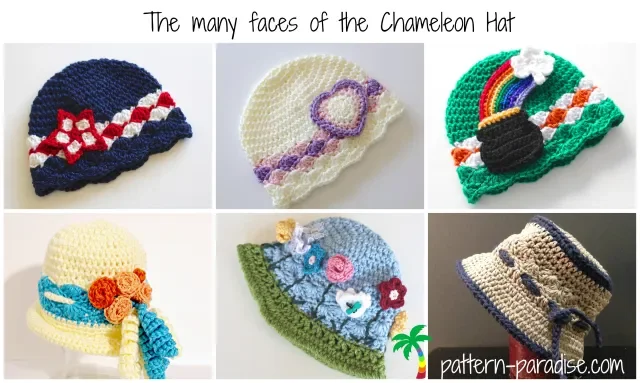
Instructions below are for Newborn – 3 month size. For other sizes, please download full pattern at bottom of this page.
***********************************************************************
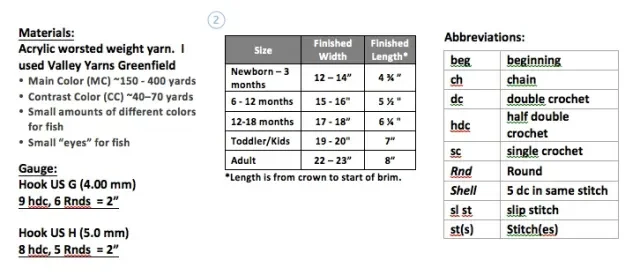
Join each round with sl st. Work instructions in [ ] as a set.
Newborn–3 months/Approximately 12 -14”
Crown – Use Hook US G (4.0 mm)
Rnd 1: With MC, make a Magic Circle, ch1, work 8 hdc in center, join. Pull tail tightly to close loop. (8 hdc)
Rnd 2: Ch1, 2hdc in each st around, join. (16 hdc)
Rnd 3: Ch1, hdc in same st, 2hdc in next st, [hdc in next st, 2hdc in next st] around, join. (24 hdc)
Rnd 4: Ch1, hdc in same st, hdc in next st, 2hdc in next st, [hdc in next 2 sts , 2hdc in next st] around, join. (32 hdc)
Rnd 5: Ch1, hdc in same st, hdc in next 2 sts, 2hdc in next st, [hdc in next 3 sts , 2hdc in next st] around, join. (40 hdc)
Rnd 6: Ch1, hdc in same st, hdc in next 3 sts, 2hdc in next st, [hdc in next 4 sts , 2hdc in next st] around, join. Your circle should be approximately 4 ¼” in diameter. (48 hdc)
Rnd 7: Join CC, ch1, sc in same st and each st around, join. (48 sc)
Sides – Use Hook US H (5.0 mm)
Rnd 8: Ch1, working in back loops ONLY, sc in same st and each st around, join. (48 sc)
Rnd 9: Join MC, working in both loops, ch1, hdc in same st and each st around, join. (48 hdc)
Band – Use Hook US H (5.0 mm)
Rnd 1: Ch1, starting in same st, [sc, skip 2, Shell in next st, skip 2] repeat around, join. (8 Shells)
Rnd 2: Ch3 (counts as dc), [sc in center of next Shell, Shell in next sc] repeat around, ending with 4 dc in beg st, join to top of beg ch3, sl st into next sc.
Rnd 3: Repeat Rnd 2.
Rnd 4: Ch3 (counts as dc), [hdc in next st, sc next 3 sts, hdc next st, dc in next st] around to end (last repeat ends with hdc), join.
Brim – Use Hook US G (4.0 mm)
Rnd 1: Ch1, sc in same st and each st around, join. (48 sc)
Rnd 2: Ch1, starting in same st [sc 3 sts, 2sc in next st], repeat to end (after last full repeat, sc remaining sts to end), join.
Rnd 3: Ch1, starting in same st [sc 4 sts, 2sc in next st], repeat to end (after last full repeat, sc remaining sts to end), join.
Rnd 4: Ch1, starting in same st, sc in each st to end, join.
Border: Join CC, ch1, starting in same st, work sc in each st around, join. Fasten off.
Now turn the hat so the inside is facing you, join CC and work sl st in each sc, join. Fasten off.
Band Cord: Chain long enough to go around the hat band and allow for tie and hang, sl st in 2nd ch from hook and each remaining ch to end. Fasten off. Weave cord evenly through last shell row of band.
Fish – Hook US G (4.00 mm)
Ch14, sl st in 5th st from hook, ch4, sl st in same st, work one stitch in each chain as follows: sl st, sc, hdc, dc next 3, hdc, sc, sl st in last ch; working along opposite side of ch, sc, hdc, dc next 3, hdc, sc, sl st, pull yarn through to wrong side and fasten off leaving a long enough strand to tie or sew in place. Glue eye in place or to avoid choking risk, embroider the eye.
For more sizes, click the button below to download the pattern:

****************************************
************************************************************************************************