Easy & Free Panda Crochet Pattern (Amigurumi Pattern)
Welcome back to another delightful crochet project! Today, we have an absolutely adorable, wonderfully cuddly, and perfectly charming amigurumi pattern for you to try: the sweetest crochet panda! If you love crafting beautiful handmade toys that perfectly capture classic plush charm while offering a beautifully detailed, lovable design to keep you engaged, this gorgeous little bear is going to be your next favorite make.
This fantastic amigurumi pattern is wonderfully adaptable and perfect for unforgettable handmade gifts, allowing you to whip up beautiful, lovable companions in no time that will be cherished as family keepsakes for years! While the instructions highlight a specific beautiful, vibrant look, you can easily adjust the color variations depending on the worsted weight yarn used—swap out classic bamboo-loving panda colors for magical pastels, soft neutrals, or vibrant bold hues to create a whimsical, personalized plush! Grab your hooks, settle into your favorite crafting spot, and let’s dive into making this wonderfully cuddly, completely adorable crochet panda!
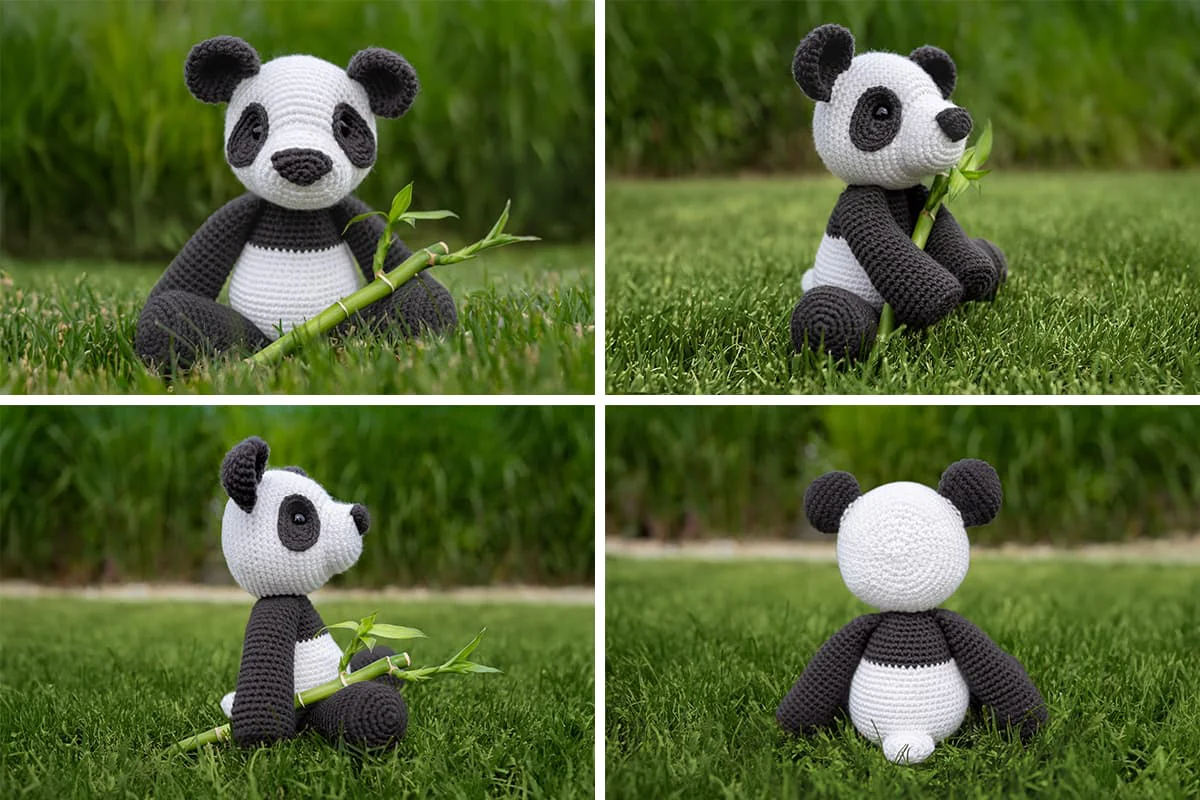
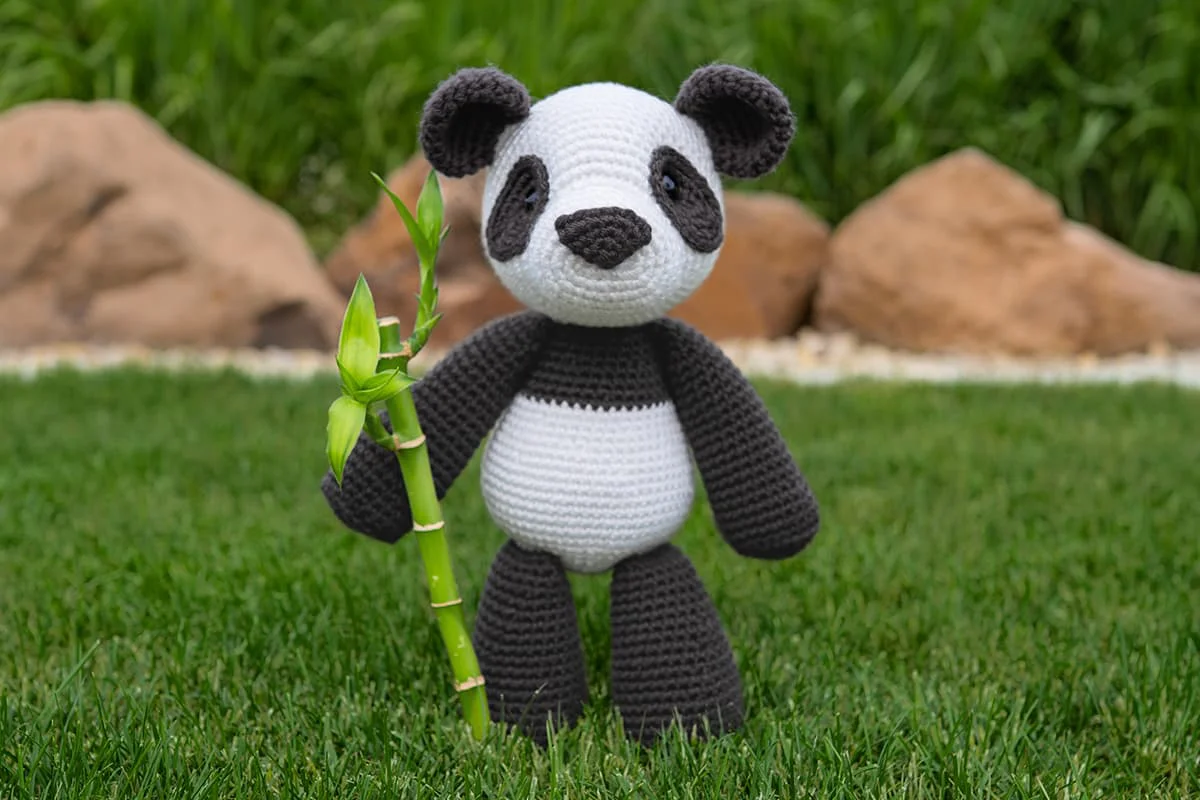
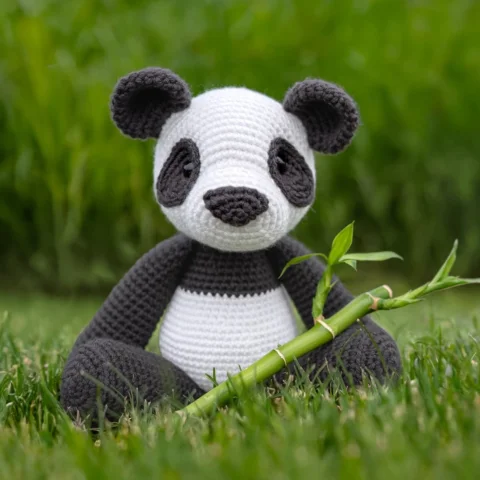
Pei the Panda
Skill level: Intermediate
Terms: US 🇺🇸
Deep in the bamboo forest lives a peaceful panda named Pei. In his wise silence, Pei imparts life lessons, leading us to inner strength & serenity.
Supplies
- 3.5mm (E) hook
- 15mm safety eyes
- Stitch markers
- tapestry needle
- Scissors
- Straight pins
- Fiber fill
- Disappearing ink marker (optional)
- Shot glass, for tracing (optional)
Yarn (acrylic, weight 4) – 247 total yards
- Black – 134 yards (I used Caron Simply Soft – Charcoal Heather)
- White – 113 yards (I used Caron Simply Soft – White)
Notes
I’ve made lots of video tutorials to help you through this project:
- Magic Ring
- Chain 5 Start
- Slip Stitch Closed
- Invisible Finish
- Ultimate Finish
- How to Attach Ears
- How to Indent Amigurumi Eyes
- How to Attach Legs | No-Sew Method
- How to Attach Tail | No-Sew Method
- How to Attach Arms | No-Sew Method
- How to Sew Head to Body
If you’re reading a printed copy of the pattern, you’ll need to visit my website in order to click the tutorial links and view the videos:
Website – jhuff.co/panda
Abbreviations
- ch – chain
- sc – single crochet
- inc – complete two single crochets within the same stitch
- dec – combine two stitches into one with an invisible decrease
- *sc x* – repeat the instructions between asterisks(*) the indicated number of times.
- (sc x) – attach a body part while completing the stitches inside parentheses as instructed by the pattern.
General Instructions
- This pattern is worked in one continuous spiral.
- Use a stitch marker to keep track of where one round ends and the next begins. I prefer to place my stitch marker in the last stitch of the round.
Recommended Sequence
Here are the steps to create your panda, in order:
- Crochet the Ears
- Crochet the Eye Ovals
- Crochet the Nose
- Crochet the Head
- Sew on the Nose
- Crochet the Legs
- Crochet the Tail
- Crochet the Arms
- Crochet the Body
- Sew the Head to the Body
Instructions
Ears (make 2)
-
With black yarn:
01. start 6 sc into a magic ring [6]
02. inc in each st around [12]
03. *sc, inc* 6 times [18]
04. sc, inc, *sc 2, inc* 5 times, sc [24]
05. *sc 3, inc* 6 times [30]
06 – 07. sc in each st around [30]
08. *sc 3, dec* 6 times [24]
09. sc, dec, *sc 2, dec* 5 times, sc [18]
10. *sc, dec* 6 times [12]
Fasten off, leaving an 18 inch yarn tail. Do not stuff the ear. Pinch the final round together and slip stitch closed. Hide the remainder of the yarn tail inside the work. Your ear is now ready to attach while crocheting the head at a later step.
Eye Ovals (make 2)
-
With black yarn:
01. Chain 5 start: ch5, inc in second ch from hook, sc 2, 5sc in the last ch. Continue on the other side of the chain base, sc 2, 3sc in the last ch [14]
02. inc, sc 4, *inc* 3 times, sc 4, *inc* 2 times [20]
03. inc, sc 6, *inc* 2 times, sc, inc, sc 6, *inc* 2 times, sc [26]
Fasten off, leaving an 24 inch tail. Create an Invisible Finish and secure with a knot on the back of the work. Leave the remainder of the tail intact; You will use this to sew the Eye Oval to the head at a later step.
Nose
-
With black yarn:
01. start 6 sc into a magic ring [6]
02. *sc, inc* 3 times [9]
03. sc, inc, *sc 2, inc* 2 times, sc [12]
04. *sc 2, inc* 4 times [16]
Fasten off, leaving a 24 inch tail. Do not stuff the nose. Pinch the final round together and slip stitch closed. The remainder of the tail will be used to sew the nose to the head at at later step.
Head
-
With white yarn:
01. Chain 5 start: ch5, inc in second ch from hook, sc 2, 5sc in the last ch. Continue on the other side of the chain base, sc 2, 3sc in the last ch [14]
02. inc, sc 4, *inc* 3 times, sc 4, *inc* 2 times [20]
03. inc, sc 6, *inc* 2 times, sc, inc, sc 6, *inc* 2 times, sc [26]
04. inc, sc 8, *inc, sc* 2 times, inc, sc 8, *inc, sc* 2 times [32]
05. sc 14, *inc* 2 times, sc 14, *inc* 2 times [36]
06 – 07. sc in each st around [36]
08. *sc, dec* 12 times [24]
09. inc in each st around [48]
10. *sc 7, inc* 6 times [54]
11. sc 4, inc, *sc 8, inc* 5 times, sc 4 [60]
12 – 18. sc in each st around [60]
Attaching the Ears: In the next round, you’ll be attaching the ears. To view a video tutorial, see “How to Attach Ears” in the Notes section of the pattern. 19. sc, Attach the first ear: (sc 6), sc 12, Attach the second ear: (sc 6), sc 35 [60] At the end of round 19, the ears should appear centered on the top of the head. If your ears appear off center, redo the round and adjust the placement of the ears as necessary.
20 – 22. sc in each st around [60]
23. sc 4, dec, *sc 8, dec* 5 times, sc 4 [54]
24. *sc 7, dec* 6 times [48]
25. sc 3, dec, *sc 6, dec* 5 times, sc 3 [42]
26. *sc 5, dec* 6 times [36]
27. sc 2, dec, *sc 4, dec* 5 times, sc 2 [30]
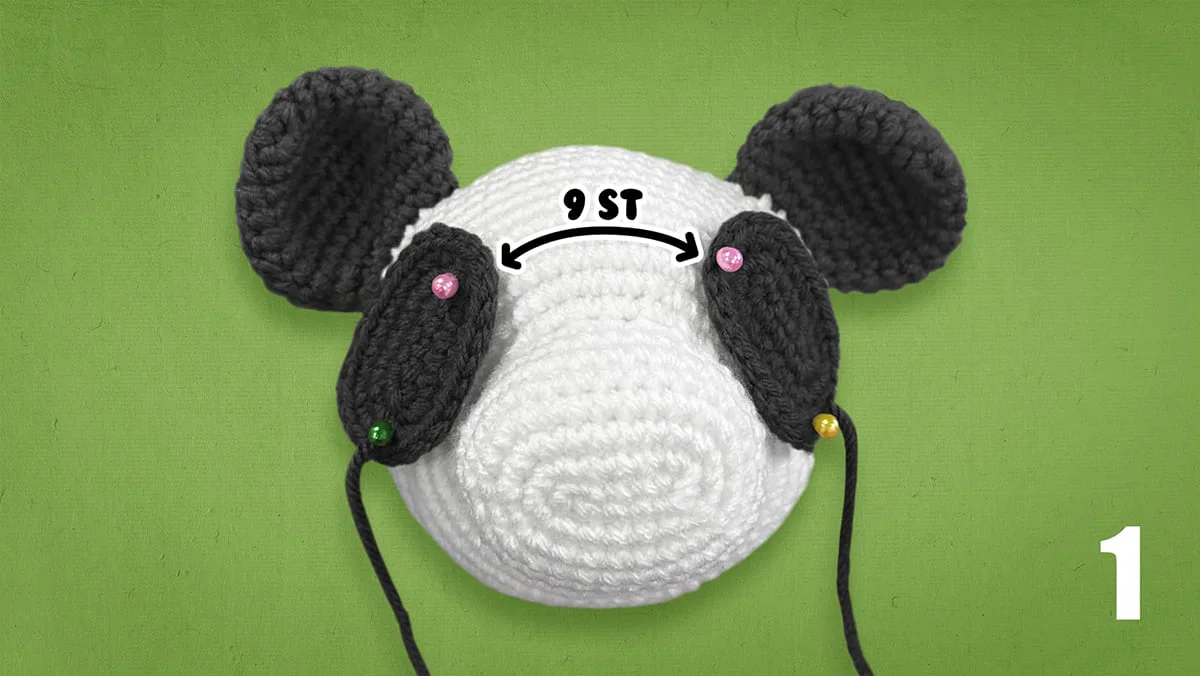
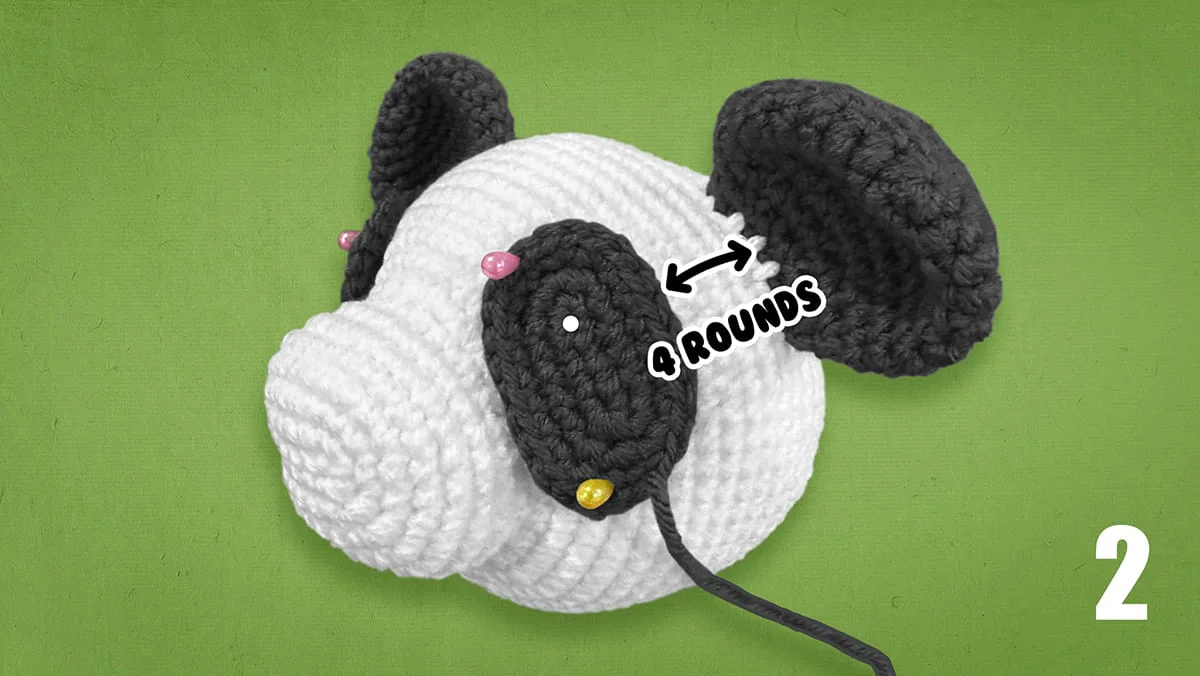
Stuff head ¾ full. Pin the Eye Ovals to the head with 9 stitches in between, and 4 rounds before the ears. To view photos of the placement, see Figures 1 & 2 in the Notes section of the pattern. When you’re satisfied with the placement, sew
the Eye Ovals to the head. The safety eyes will be placed in the top chain of the Chain 5 Start used to begin round 1 of each Eye Oval (see the white dot in Figure 2 for placement).
Create indents for the eyes, then insert your safety eyes and secure the backings. To view a video tutorial, see “How to Indent Amigurumi Eyes” in the Notes section.
Tip: It can be difficult to insert the safety eyes through two layers of crochet. You can use something sharp (like a pen) to push through both layers & create a hole before inserting the eye.
28. *sc 3, dec* 6 times [24]
29. sc, dec, *sc 2, dec* 5 times, sc [18]
Finish stuffing.
30. *sc, dec* 6 times [12]
31. *dec* 6 times [6]
Fasten off, leaving a tail of about 8 inches. Close with an Ultimate Finish, then hide the tail inside the work.
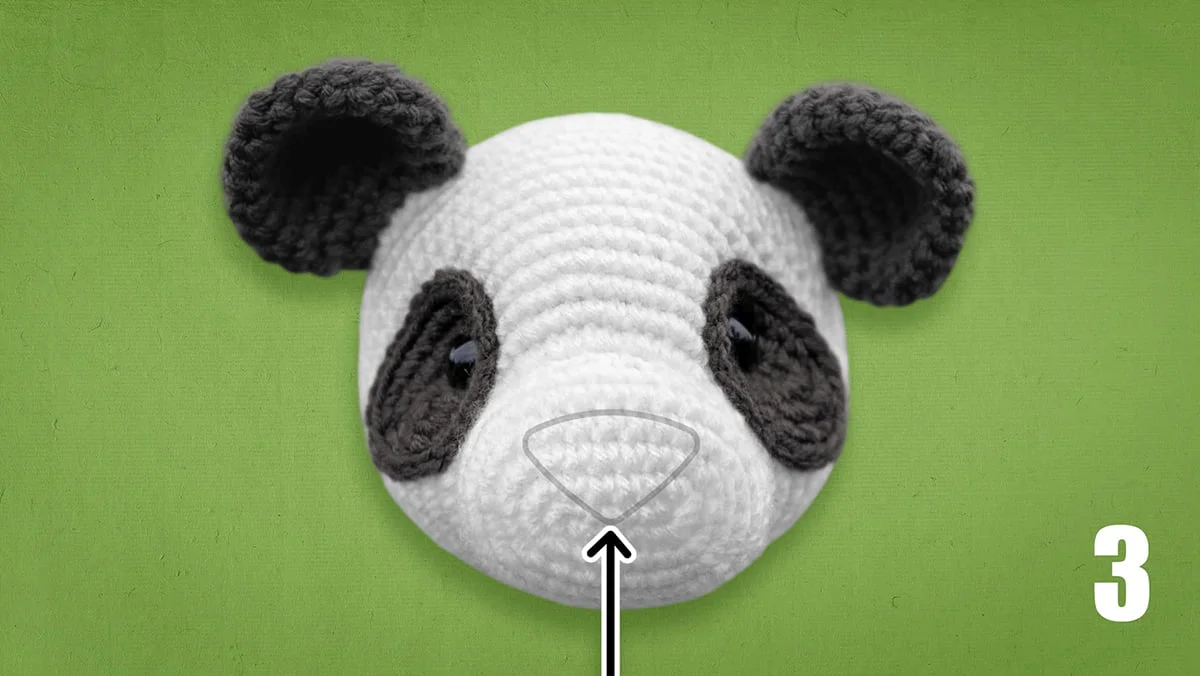
Sew the nose to the panda’s snout. The tip of the nose should be centered over the first round of the head (see Figure 3).
Legs (make 2)
-
With black yarn:
01. start 6 sc into a magic ring [6]
02. inc in each st around [12]
03. *sc, inc* 6 times [18]
04. sc, inc, *sc 2, inc* 5 times, sc [24]
05. *sc 3, inc* 6 times [30]
06. BLO: sc in each st around [30]
07 – 09. sc in each st around [30]
10. sc 14, dec, sc 14 [29]
11. sc 27, dec [28]
12. sc 13, dec, sc 13 [27]
13. sc 25, dec [26]
14. sc 12, dec, sc 12 [25]
15. sc 23, dec [24]
16. sc 11, dec, sc 11 [23]
17. sc 21, dec [22]
18. sc 10, dec, sc 10 [21]
19. sc 19, dec [20]
20. sc 9, dec, sc 9 [19]
21. sc 17, dec [18]
22. *sc 7, dec* 2 times [16]
23. *sc 2, dec* 4 times [12]
Fasten off, leaving an 18 inch yarn tail. Stuff the leg. Pinch the final round together and slip stitch closed. Hide the remainder of the yarn tail inside the work. Your leg is now ready to attach while crocheting the body at a later step.
Tail
-
With white yarn:
01. start 6 sc into a magic ring [6]
02. inc in each st around [12]
03. *sc, inc* 6 times [18]
04. sc, inc, *sc 2, inc* 5 times, sc [24]
05. *sc 2, dec* 6 times [18]
06. *sc, dec* 6 times [12]
Fasten off, leaving a 18 inch yarn tail. Lightly stuff the tip of the tail. Pinch the final round together and slip stitch closed. Hide the remainder of the yarn tail inside the work. Your tail is now ready to attach while crocheting the body at a later step.
Arms (make 2)
-
With black yarn:
01. start 6 sc into a magic ring [6]
02. inc in each st around [12]
03. *sc, inc* 6 times [18]
04. sc, inc, *sc 2, inc* 5 times, sc [24]
05. BLO: sc in each st around [24]
06 – 08. sc in each st around [24]
09. sc 11, dec, sc 11 [23]
10. sc in each st around [23]
11. sc 21, dec [22]
12. sc in each st around [22]
13. sc 10, dec, sc 10 [21]
14. sc in each st around [21]
15. sc 19, dec [20]
16. sc in each st around [20]
17. sc 9, dec, sc 9 [19]
18. sc in each st around [19]
19. sc 17, dec [18]
20. sc in each st around [18]
21. sc 8, dec, sc 8 [17]
22. sc in each st around [17]
23. sc 15, dec [16]
24 – 25. sc in each st around [16]
26. *sc 2, dec* 4 times [12]
Fasten off, leaving an 18 inch yarn tail. Stuff the arm. Pinch the final round together and slip stitch closed. Hide the remainder of the yarn tail inside the work. Your arm is now ready to attach while crocheting the body at a later step.
Body
-
With white yarn:
01. start 6 sc into a magic ring [6]
02. inc in each st around [12]
03. *sc, inc* 6 times [18]
04. sc, inc, *sc 2, inc* 5 times, sc [24]
05. *sc 3, inc* 6 times [30]
06. sc 2, inc, *sc 4, inc* 5 times, sc 2 [36]
Attaching the Legs: Attach the legs where instructed while crocheting the next round. To view a video tutorial, see “How to Attach Legs | No-Sew Method” in the Notes section of the pattern.
07. Attach the first leg: (sc 5, inc), sc 5, inc, Attach the second leg: (sc 5, inc), *sc 5, inc* 3 times [42]
08. sc 3, inc, *sc 6, inc* 5 times, sc 3 [48]
09. *sc 7, inc* 6 times [54]
10. sc 4, inc, *sc 8, inc* 5 times, sc 4 [60]
Attaching the Tail: Attach the tail where instructed while crocheting the next round. To view a video tutorial, see “How to Attach Tail | No-Sew Method” in the Notes section of the pattern.
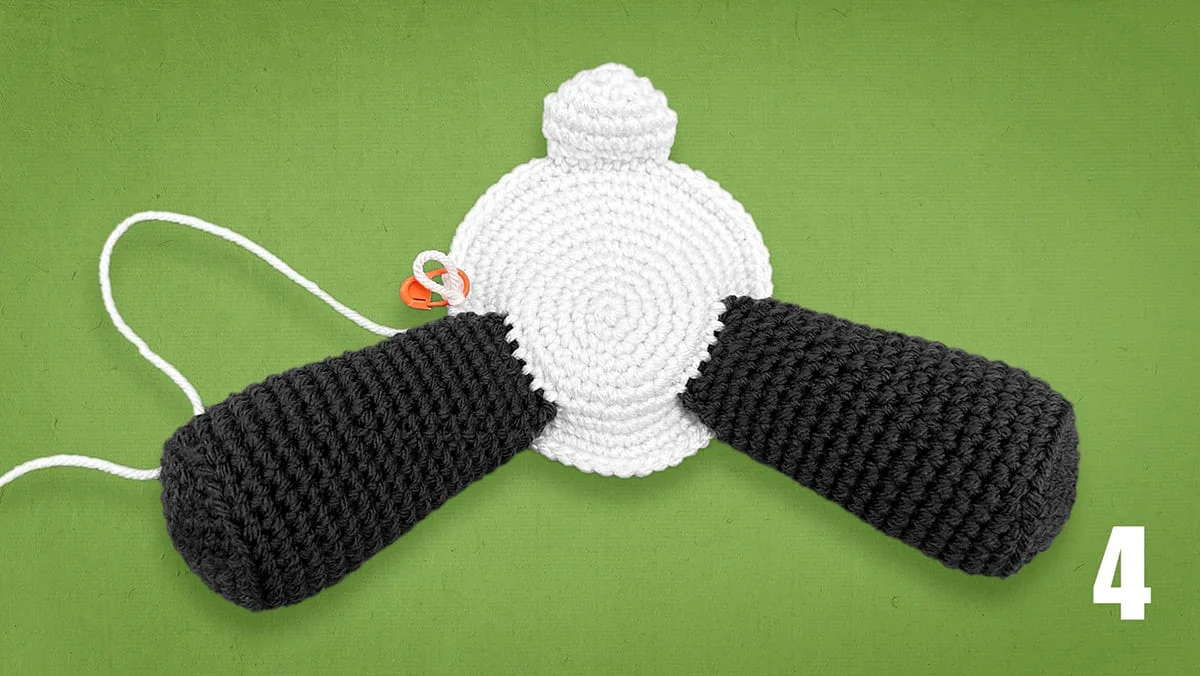
11. sc 41, Attach the tail: (sc 6), sc 13 [60]
At the end of round 11, the tail should be centered above the legs on the opposite side of the round. If your tail appears off center, redo the round and adjust the placement of the tail as necessary.
To view a photo of what your work should look like at this stage, see Figure 4 in the Notes section of the pattern.
12 – 17. sc in each st around [60]
18. sc 4, dec, *sc 8, dec* 5 times, sc 4 [54]
19. sc in each st around [54]
20. *sc 7, dec* 6 times [48]
21. sc in each st around [48]
22. sc 3, dec, *sc 6, dec* 5 times, sc 3 [42]
23. sc 24, Switch to black yarn for remainder of body: sc 18 [42]
24. sc in each st around [42]
25. *sc 5, dec* 6 times [36]
26 – 27. sc in each st around [36]
28. sc 2, dec, *sc 4, dec* 5 times, sc 2 [30]
29. sc in each st around [30]
Attaching the Arms: Attach the arms where instructed while crocheting the next round.
To view a video tutorial, see “How to Attach Arms | No-Sew Method” in the Notes section of the pattern. 30. sc, Attach the first arm: (sc 6), sc 8, Attach second arm: (sc 6), sc 9 [30]
At the end of round 30, the arms should be centered above the legs. If your arms appear off center, redo the round and adjust the placement of the arms as necessary. Stuff the body.
31. *sc 3, dec* 6 times [24]
Fasten off and leave a tail the length of your arm span (5+ feet). The final step is to sew the head to the body. To view a video tutorial, see “How to Sew Head to Body” in the Notes section.